General Questions
Frequently asked questions
How can I change time & date on our Partner phone system?
How can I change time & date on our Partner phone system?
Avaya Partner Time Change and Programming Tips
Programming Without Button Overlays: Although it is advisable to have a Partner programming manual and overlays when performing changes. Here are the basic steps for changing the system time, day and date. The "Feature" key is self-explanatory, while other keys need a reference. "System Program" key is the left intercom key on the phone. The "Central Tel" key is the right intercom key. The "Next Data" key is the third key from the left with an LED on the top row of an 18-button display set. Numbers # and * are simply entered as numbers on the dial pad.
Avaya Partner System Date Program #101
Use this program to set the month, day and year. The system displays only the month and day on display telephones when the telephone is idle: the month, day and year also print out on SMDR call reports when used.
Considerations: The System Date date-stamps the backup files when you use Backup Programming.
Programming Without Button Overlays: The "Feature" key is self-explanatory, while other keys need a reference. "System Program" key is the left intercom key on the phone. The "Central Tel" key is the right intercom key. Numbers are simply entered as numbers on the dial pad.
Programming:
To change system date: Press Feature, 00, System Program, System Program, #101 at extension 10 or 11. Enter today's date in the form of "mmddyy" (Month, day, and year), including leading zeros for single-digit months or days. For example, to enter April 26, 2003, press 042603. A display similar to the following appears:
System Date Data 042603
Exit programming mode by pressing Feature, 00 or lifting and hanging up the handset.
Avaya Partner System Day Program #102
Use this program to set the day of the week that appears on the system display telephones.
Programming:
To change system day: Press Feature 00, System Program, System Program, #102 at extension 10 or 11. Change the day by pressing "Next Data" until the day you want appears:
-
1 = Sunday
-
2 = Monday
-
3 = Tuesday
-
4 = Wednesday
-
5 = Thursday
-
6 = Friday
Exit programming mode by pressing Feature, 00 or lifting and hanging up the handset.
Avaya Partner System Time Program #103
Considerations: Enter the time in 24-hour notation. In this scheme, the hours of the day are 0000 (12 midnight) to 2459 (11:59). Since each time must have four digits, use leading zeros when necessary. The time appears on system phones as A.M. or P.M., not 24-hour notation.
Programming:
To change system time: Press Feature, 00, System Program, System Program, #103 at extension 10 or 11. Enter a new time in 24-hour notation. For example, to set the time to 2:15 P.M., press 1415. This time will appear on the phone as 2:15 P.
Select the next procedure or exit programming mode by pressing Feature, 00 or lifting and hanging up the handset.
What is the right way to install phone cable?
What is the right way to install phone cable?
Location:
Where the phone system is installed is very important. The equipment needs to be mounted where it is dry (not humid), dust-free, well lighted. The phone system and related hardware should be mounted on a plywood backboard if possible. Allow plenty of room for the equipment and future expansion. Few things are as frustrating as having to mount equipment and not having enough room or light to work. Think ahead. Location is important when considering cabling, also. Cables need to be run from each telephone jack back to the telephone system. This is called a "Star" configuration. Individual cables are run from the phone system to each telephone location. The phone system ends of the cables are terminated on patch panels, jacks or punch down blocks. The telephone end of each cable is terminated onto a Surface Mount Jack or Flush Mount Jack. Also see our page on "How To Wire A Phone Jack"
phone
|
|
|
phone--------telephone system---------phone
|
|
|
phone
Some telephones, such as telephones purchased from consumer or office supply stores, are installed in a "Daisy Chain" configuration. This is when cables are connected from the phone company lines to the telephone to the telephone and so on. One telephone is sometimes labelled as the main telephone or master telephone. This type of installation is ok for smaller applications, as there are often limitations to useful features and the expandability of the system is limited.
phone-----------phone
|
|
|
phone-----------phone
Telephones connected in this way are inherently prone to cross-talk, limited features, and little, if an,y expansion. They are also more subject to being discontinued, important if you plan to expand your business in the future.
Installing Cable:
To install a new cable, you need to consider a few things. First of all, the proper cable must be used. Cable is classified by "category". Telephones require category 2 or category 3 cable, not category 5. There are 8 wires or 4 "pairs" in this cable. Secondly, what is the best way to install cables and keep them concealed? Most office areas have hollow walls and suspended ceilings. In this case, concealing the cable will be relatively easy. First, try to locate any "cross studs" in the walls. These are obstructions that run horizontally between the wall studs inside the walls. Cross studs are not all that common in newer construction, but are found in many older buildings. Obstructions and wall studs can usually be located by lightly tapping on the wall. A lower thud sound should indicate a hollow behind the sheet rock. This is good. A higher or more solid sound would indicate a stud or obstruction inside the wall; this is bad. Since most wall frame construction runs vertically, there is a space between the studs called a "bay". Bays normally run between 16' and 24' inches wide.
______________________________Top of wall
| | |
| | |
| | |
| | |
| | |
| | |
| | |
________________________________Floor
The trick is to poke a small hole, about an inch in diameter, in between the studs in one of the bays about 18 inches off the floor. This is where your telephone cable will come out of the wall, and the jack will be installed. There are a few ways to get the cable from this hole to above the ceiling tiles. One is to have a "Fish Tape" or "Snake". Fish tapes can usually be rented and rental centers. They are expensive to purchase if you are not going to use them a lot. This is a coiled piece of wire that is pushed up inside the wall between the studs to come out above the ceiling tiles. The cable, which has been run from the telephone system, is connected to the end of the fish tape and pulled down the wall and out of the hole. If there are no hollow walls where the phone needs to be placed, you may need to look at alternative routes. Running cables under the floor and up is one option. Exposing the cable is another way. Running exposed cable is the last option. Make sure that the cables you run are marked on each end for easy identification when it comes time to connect them.
Reusing Existing Cable:
Many older office spaces have existing cable. This is usually a good thing, but not always. For one thing, not having installed the cable yourself, it may be harder to locate each end. In this case, a "Toner & Wand Set" will come in handy. The telephone is one of the telephone person's most important tools. It is a small cube, about the size of a small brownie. It has two leads with clips on the ends. By connecting the leads to one end of the cable, usually the phone end, a tone can be transmitted over the cable back to the other end, usually the telephone system end (hopefully). This brings us to one of the other most important tools, a "Wand". The wand is an inductance amplifier. It can pick up electrically transmitted noise, such as noise from a toner or even a fluorescent light. The wand does not have to actually touch the cable to work. It picks up sound signals from a few inches away. These two tools together can save professional telephone techs and "do-it-yourselfers" a lot of time. We have these tools in stock. Click here on "Tools" for description and pricing.
Connecting Cables:
Making mistakes or assuming can cause wasted time, frustration and possible damage to your equipment. This should be avoided. It is very important that the connection and termination of telephone cables is done properly. To avoid problems, follow directions in the installation manual if you have one or purchase one here. There are a few things to consider. First of all, how many wires are required to run the telephone you are connecting? Some telephones require 2 wires, some 4 wires, some require more. In addition to how many wires are required, the connection on each end is just as important. Due to the many possible connection configurations, it is not feasible to publish all of this information. If you have a question about the wire connection, please contact us.
Were can I get information on installing & wiring a phone jack?
Were can I get information on installing & wiring a phone jack?
Phone wiring is normally done with Category 2 (CAT2)or Category 3 (CAT3)cable. Category 5 cable (CAT5)can also be used, but it is not required for phone jack connections. CAT5 is only required for higher speed connections, such as computer networking or T1 connections, where more data is passed through the connection. When using CAT5 cable, it is important to also use CAT5 connection hardware such as CAT5 Phone Jacks and/or Patch Panels. For detailed information on installing cables and telephone wiring, visit our page on "Installing Phone Cable"
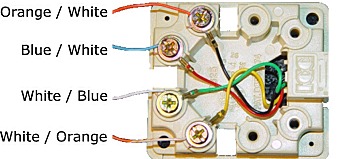
Here is an example of how most 4-wire phone systems are connected to a standard surface mount phone jack. It may be necessary on some systems to "flip" the Orange/White & White/Orange pair to make the phone work.
2-wire systems such as Avaya Magix, Toshiba, IVX, Nortel and Vodavi would only require the Blue/White - White/Blue pair to be connected to the 2 center pins or the Green Red wires of the jack.
Wires should be stripped back approximately 1/2 an inch and wound around the binding lug in a clockwise direction, being careful not to cross over the wire already wound in the lug.
RJ11: Provides connection for 1 pair of wires.
RJ14: Provides connection for 2 pairs of wires.
RJ31X: Provides connection for line bypass for applications such as alarm systems.
RJ21X: Telephone Company Interface for 25 pair cable.
What can be done about Panasonic voicemail system security?
What can be done about Panasonic voicemail system security?
Changing Panasonic KX-TVS/TVA System Passwords
Because it is possible for hackers to bypass both computer and voicemail system security features, we strongly recommend that our customers take the time to password-protect all mailboxes, including system administration mailboxes. This is necessary to protect your system against unauthorized use, hacking and theft of phone service.
System Administration Mailboxes
Your system administration mailboxes are 998 & 999. Program these passwords by calling into voicemail (VM Button), when the voicemail responds, press #6*99(X). It will appear you are logged into a normal mailbox. Press 3 to add a password. It is very important you notate these passwords, as losing them will require logging into your voicemail via a laptop to reset.
End User Mailboxes
Log into your mailbox by pressing the VM button on your phone. When the voicemail responds, press 5 for mailbox management, then 2 to change your password.
telephonesystems.com will not be held responsible for any service theft due to non-compliance with this recommendation.
Does telephonesystems.com provide over the phone technical support?
Does telephonesystems.com provide over the phone technical support?
Telephonesystems.com provides over-the-phone technical support for our customers across the country, 15 minutes for $25.00. Should you require a full hour you will receive a discounted hourly rate of $90.00. We provide programming assistance and technical support for Avaya IP Office, Avaya Partner, Avaya Magix, Merlin Classic, Merlin Legend, Panasonic KX-NCP 500/1000, KX-TDE 100/200, KX-TDA 50/50G/100/200, KX-TD1232, KX-TD816, KX-TD308, KX-TA824, KX-TA624, KX-TA1232, Technical support is provided through our 800 number from 8AM to 5PM Monday through Friday Eastern Standard Time. Support after normal business hours, during holidays and on weekends is also available via our emergency mailbox. Please call us at 800-231-8726 to schedule support or if you have any questions.
.png "telephonesystems.com")
-1.png "telephonesystems.com")
-1-1.png "telephonesystems.com")
